The Toolbox in CorelDRAW is the vertical panel usually located on the left side of your workspace. It's the starting point for nearly every creative task, containing all the essential drawing, editing, and manipulation tools. Whenever you want to: Create shapes; Draw lines; Add text; Customize colors; Edit nodes ...the Toolbox is where you begin your journey. Essential Tools in the Toolbox include Pick Tool, Shape Tool, Crop Tool, Zoom Tool, Curve Drawing, Text Tool and many more...
Even though the Toolbox contains many tools, every workflow typically starts or ends with the Pick Tool, making it the heart of object management in CorelDRAW. In my practical work, I've found the Pick Tool to be the "king" of tools because it's the most critical and frequently used. In fact, most actions in CorelDRAW start with selecting an object, and that means reaching for the Pick Tool (shortcut: Space or Ctrl+Space).
Three Major Uses of the Pick Tool include:
1. Selecting
2. Positioning
3. Transforming
objects on the CorelDRAW canvas.
1. Selecting Objects in CorelDRAW
In CorelDRAW, the Pick Tool is essential for selecting any object within your document, which is a prerequisite for moving, resizing, editing, or performing modifications.
Once you select an object, additional toolbars such as the Property Bar and Status Bar automatically update to display relevant information and settings, enhancing workflow efficiency.
Nearly every action—including aligning, grouping or ungrouping, locking or unlocking, and applying effects—begins with selection using the Pick Tool. You can select not only visible objects but also those concealed behind others, as well as individual items within groups or nested groups.
Furthermore, CorelDRAW enables you to choose objects based on their creation order, select all at once, or easily deselect objects as needed. Upon selection, a bounding box outlines the object, and a distinctive "X" appears at its center to confirm it's active.

Object Selection (in grouped & ungrouped objects)
You can efficiently move, transform, or format all grouped objects simultaneously, enhancing layout and editing workflows in CorelDRAW. To group items, simply select two or more objects and press Ctrl+G or right-click to choose “Group,” while ungrouping is done by selecting the group and pressing Ctrl+U. For advanced control, you can ctrl+click within a group to select individual elements without ungrouping, and right-clicking offers quick access to context menus for grouping, ungrouping, alignment, or other actions. If you lose track of your selection, check the Status Bar—it always shows which object(s) are active. Object selection is versatile: use the Pick tool and click on objects, hold Shift to select multiples, or drag a marquee area for rectangular or irregular selections (with modifiers like Command/Ctrl, Alt, or Option for constraints or partial selection).

The Freehand pick tool allows more organic selection shapes, and holding Option while dragging includes partially enclosed objects. Navigating by creation order is possible with Shift+Tab or Tab for first or last-created objects, while selecting all objects is as simple as double-clicking the Pick tool or pressing Ctrl+A. Objects inside groups or nested groups are targeted by holding Command/Ctrl and clicking repeatedly until the desired selection box appears, and hidden objects can be accessed using Option, Shift+Option, or Command/Ctrl+Option with the Pick or Freehand pick tools. For stacked or obscured items, Alt+click reveals objects concealed behind others, with the Status Bar confirming each hidden selection—making object management and manipulation both precise and streamlined.
To select objects
To | |
| Click the Pick tool  , and then click an object. , and then click an object. |
| Click the Pick tool  , hold down Shift, and click each object that you want to select. , hold down Shift, and click each object that you want to select. |
Marquee select objects by using a rectangular selection area
Marquee select objects with partial contact/Select only part of an object (especially useful when objects overlap). | Click the Pick tool  , and drag around the objects that you want to select. , and drag around the objects that you want to select. To constrain the selection area to a square, hold down Command or Ctrl while dragging.
Hold Alt key and draw marque with the Pick tool  and Freehand pick tool and Freehand pick tool  |
Marquee select objects by using a selection area of irregular shape | Click the Freehand pick tool  , and drag around the objects that you want to select. , and drag around the objects that you want to select. Objects that are only partially enclosed by the selection area are not selected. To select objects that are only partially enclosed by the selection area, hold down Option while dragging. To constrain the selection area to a rectangular shape, hold down Command or Ctrl while dragging. |
Select an object while reviewing objects in the order of their creation, starting with the first object created | Click the Pick tool  , and then press Shift + Tab one or more times, until a selection box appears around the object that you want to select. , and then press Shift + Tab one or more times, until a selection box appears around the object that you want to select. |
Select an object while reviewing objects in the order of their creation, starting with the last object created | Click the Pick tool  , and then press Tab one or more times, until a selection box appears around the object that you want to select. , and then press Tab one or more times, until a selection box appears around the object that you want to select. |
| Click Edit  Select All Select All  Objects. Objects. You can also double click on the Pick tool  , , OR press Ctrl + A |
Select an object in a group | Hold down Command or Ctrl, click the Pick tool  , and then click an object in a group. , and then click an object in a group. |
Select an object in a nested group | Hold down Command or Ctrl, click the Pick tool  , and then click an object one or more times, until a selection box appears around it. , and then click an object one or more times, until a selection box appears around it. |
Select an object hidden from view by other objects | Hold down Option, click the Pick tool  or the Freehand pick tool or the Freehand pick tool  , and then click the topmost object one or more times, until a selection box appears around the hidden object. , and then click the topmost object one or more times, until a selection box appears around the hidden object. |
Select multiple hidden objects | Hold down Shift + Option, click the Pick tool  or the Freehand pick tool or the Freehand pick tool  , and then click the topmost object one or more times, until a selection box appears around the hidden objects. , and then click the topmost object one or more times, until a selection box appears around the hidden objects. |
Select a hidden object in a group
and
Select objects underneath others | Hold down Command or Ctrl + Option, click the Pick tool  , and then click the topmost object one or more times, until a selection box appears around the hidden object. , and then click the topmost object one or more times, until a selection box appears around the hidden object.
Hold Alt and click to select objects that are stacked or hidden behind others. |

The status bar displays a description of each hidden object as you select it.
Selection Groups
Selection Groups enable you to group multiple objects so they can be selected and edited together as a single unit, which is particularly useful for managing complex designs or repeated patterns in CorelDRAW. To create a Selection Group, click the Pick tool, hold Shift, and click each object you want to include, then press Command or Ctrl plus a number from 0 to 9, which assigns that number to the new group. To select all objects in a specific Selection Group, simply press its assigned number, and pressing the number twice will both select and zoom in on all group members. If you wish to add more objects, select the new object and press Option with the Selection Group’s designated number, making it easy to build and manage dynamic groups for efficient editing.
To create a selection group
Click the Pick tool  , hold down Shift, and click each object that you want to include in the selection group.
 Press Command or Ctrl + a number from 0 to 9.
The number you pressed is associated with the new selection group.
| |
Select all objects in a selection group | Press the number associated with the selection group. |
Select and zoom in on all objects in a selection group | Press twice the number associated with the selection group. |
Add an object to a selection group | Select the object, and press Option + the number associated with the selection group.
|
Object Deselection (in single & multiple selection)
Object deselection, which is essentially the reverse of selection, allows you to clear your active choices and refine your focus on specific elements within your design. To deselect all currently selected objects, simply click the Pick tool and then click on any blank area of the drawing window. If you are working with multiple selected objects and wish to deselect just one, hold down Shift, activate the Pick tool, and click on the particular object, thereby removing it from the group selection while leaving the others active—making workflow adjustments both simple and efficient.
To deselect objects
To | |
| Click the Pick tool  , and click a blank space in the drawing window. , and click a blank space in the drawing window. |
Deselect a single object among multiple selected objects | Hold down Shift, click the Pick tool  , and then click the object. , and then click the object.
|
Treat All Objects as Filled
The “Treat all objects as filled” option in CorelDRAW, accessible via Workspace > Toolbox > Pick Tool settings or directly from the property bar when no object is selected, determines how objects are targeted for selection: when enabled (which is the default), you can click anywhere inside an object—including hollow or unfilled areas—to select it, offering convenience when working with thin shapes or outline art; if disabled, selection requires clicking precisely on the object’s outline or hairline, which is useful for detailed vector designs or overlapping elements. To modify this behavior, navigate to CorelDRAW menu > Preferences > Tools, select Pick in the left pane of the dialog box, and check or uncheck “Treat all objects as filled.” Enabling this setting allows selection by clicking the outline or inner area, whereas disabling limits selection to just the outline. Additionally, you can toggle this feature on the property bar using the Pick tool whenever no objects are currently selected, providing flexible control over selection methods for various design needs.
To change how unfilled objects are selected
1 Click CorelDRAW menu  Preferences
  Tools.
 2 In the left pane of the dialog box that appears, click Pick. 3 Enable or disable the Treat all objects as filled check box. Enabling the check box lets you select an unfilled object by clicking on its outline or the area enclosed by the outline; disabling the check box lets you select an unfilled object by clicking only on its outline. 
Using the Pick tool, you can also click the Treat all objects as filled button on the property bar when no objects are selected.
The Object Manager Docker
While more advanced features of the Object Manager docker will be reviewed in a future post, the Object Manager (known as the Objects docker in recent CorelDRAW versions) offers a visual panel that streamlines the selection and management of objects, layers, and groups—especially those difficult to click directly on the canvas. It is somehow similar to the Layer panel in Photoshop, Canva, PixelLab and other design tools. With the Objects docker, users can efficiently lock or unlock, hide, and rearrange elements, manage layers and pages, and explore various viewing options. Selecting multiple objects is simplified with shift-select, allowing batch editing or deletion, while ctrl-select makes it easy to expand groups and access items within them. Additionally, users can leverage quick selection based on color or layer using the Object Manager’s integrated Find/Replace features, enabling the targeting of all objects sharing specific properties such as fill color, outline, or layer placement, which greatly speeds up complex design workflows.
2. Positioning Objects in CorelDRAW
In CorelDRAW, positioning objects is primarily managed using the Pick Tool, which allows you to intuitively move any object within your workspace; additionally, precise adjustments can be made through the property bar, where you can enter specific values for an object’s position. The status bar often displays the current position of the selected object and cursor, providing valuable feedback on distance and direction in relation to the X and Y axes, reflecting CorelDRAW’s 2D Cartesian coordinate system.
You can further refine object placement using shortcuts like Alt+F7 or by navigating to Menu > Objects > Transformation > Position, and by utilizing Object > Align & Distribute commands to align objects left (L), right (R), top (T), bottom (B), center (C), equally (E), or to the page (P); for distributing objects, Ctrl+Shift+A is another useful shortcut.
CorelDRAW offers advanced options such as moving objects during the drawing process, nudging objects by set increments (with customizable nudge distances), positioning objects by entering precise X and Y coordinates, and adjusting the object’s anchor point to determine how position changes are applied, all of which contribute to highly controlled and versatile object placement within your designs.
↔️ Move Objects – Drag the object around to place it exactly where you want.
Objects in CorelDRAW can be positioned by simply dragging them to a new location, by nudging them in set increments using the arrow keys, or by entering precise horizontal and vertical coordinates; nudging moves the object by the “nudge distance” (default is 0.1 inch but can be customized to your needs), with micro-nudging enabling movement by a fraction and super-nudging allowing movement by a multiple of the nudge distance. These methods offer fine control, including setting coordinates relative to the object’s center anchor or other anchor points, and also make it possible to relocate objects across different pages, supporting accuracy and flexibility in layout design.
To move an object
2 Point to the center of the bounding box. 3 When the position cursor appears, drag the object to a new position in the drawing. 
You can move an object to another page by dragging the object over a page number tab at the bottom of the document window and then dragging the object into the document window.
To move an object while drawing
1 Start drawing a shape such as a rectangle, ellipse, or polygon. 2 Hold down the right mouse button without releasing the left mouse button, and drag the unfinished object to its new position. 3 Release the right mouse button, and continue drawing. Moving an object while drawing
To nudge an object
| |
Nudge a selected object by the nudge distance | |
Nudge a selected object by a fraction of the nudge distance (micro-nudge) | Hold down Ctrl, and press an Arrow key. |
Nudge a selected object by a multiple of the nudge distance (super-nudge) | Hold down Shift, and press an Arrow key. |
To set nudge distances
1 Click Layout  Document Options.
 2 In the left pane of the dialog box, click Rulers. 3 Type a value in any of the following boxes: 
You can also set the nudge distance by deselecting all objects and typing a value in the Nudge distance box on the property bar.
To save the new nudge distances to use in new drawings, click Tools  Save Settings as Default.
To position an object by x and y coordinates
If you want to change the object origin, click a point on the Object Origin button  on the property bar.
 2 Type values in the following boxes: • x — lets you position the object on the x-axis • y — lets you position the object on the y-axis The x and y values specify the exact position of the object origin. 
The object origin, also known as "anchor point" or "reference point," can be the center of an object or any one of the object’s selection handles. The object origin remains stationary when an object is positioned by typing values in the x and y boxes on the property bar.
To position an object by changing the anchor point
2 Click Window  Dockers
  Transform.
 3 Click the Position button  .
. 4 Disable the Relative position check box in the Transform docker. 5 Type values in the following boxes: • X — lets you specify a value for the position of an object along the horizontal axis • Y — lets you specify a value for the position of an object along the vertical axis 6 Enable the check box that corresponds to the anchor point that you want to set. 
By default, the point of origin (0,0) is at the lower-left corner of the drawing page.
When you enable the Relative position check box on the Transform docker, the position of the center anchor point is identified as 0,0 in the X and Y boxes. When you specify a different position in the X and Y boxes, the values represent a change from the current position as measured from the center anchor point of the object.
3. Transforming Objects in CorelDRAW
Transformation in CorelDRAW encompasses a wide range of operations including resizing, rotating, skewing, scaling, mirroring, and more—all essential for professional vector design and layout precision.
A. Transformation Basics Using Pick Tool
Resize: After selecting an object with the Pick Tool, use the corner or side handles of the bounding box to drag and resize. Hold down Ctrl for proportional scaling.
Rotate: Double-click the object to reveal rotation handles. Drag these to rotate. Holding Ctrl constrains rotation to increments (default: 15 degrees, adjustable in program settings).
Skew (Shear): Once in rotation mode (double-click), side arrows let you skew horizontally/vertically.
Mirroring: Use the Free Transform Tool or Pick Tool with the relevant modifiers. Drag a handle to the opposite side plus right-click before releasing to duplicate as a mirror. Hold Ctrl as you drag for constrained mirroring.
B. Advanced Transform Controls
Free Transform Tool: This tool allows for combined transformations: rotation, scaling, skewing, and mirroring in one unified workflow.
Rotation: Drag handles around any anchor point.
Scaling: Drag any corner, optionally set anchor point for scaling.
Skewing: Drag side handles for horizontal/vertical skew.
Mirroring: Mirror objects horizontally/vertically across a selected axis.
Nudging: Use arrow keys to nudge a selected object by the default or user-set nudge distance. Ctrl+Arrow for micro-nudge, Shift+Arrow for super-nudge (larger increments).
Entering Values: Use the property bar (or relevant dockers) to specify precise values for position, size, rotation angle, skew, etc. This is crucial for accuracy in professional layouts.
C. Batch and Group Transformations
Grouping: Select multiple objects and group (Ctrl+G); transformations apply to the whole group.
Selection Groups: Assign number keys to selection groups for batch transformation and editing.
Ungrouping: Select the group and press Ctrl+U to revert objects to individual control.
D. Dockers and Object Manager
Objects Docker: Advanced users can manage object transformations by locking, hiding, or rearranging layers/pages—streamlining transformations in complex designs.
E. Transforming with the properties bar
The Property Bar is used for instant numeric transforms:
Context-Aware Controls: When you select an object with the Pick Tool, the Property Bar updates and displays specific options related to the selected item (e.g., shape, text, group).
Precise Positioning & Sizing: Enter values for width (W), height (H), X (horizontal), and Y (vertical) coordinates directly on the Property Bar for accurate resizing and positioning.
Anchor Point Selection: The "Object Origin" button lets you set which handle or center point acts as the anchor (reference) for transformations.
Rotation & Skew: Use rotation angle and skew boxes for quick numerical adjustments; apply rotations in degrees and horizontal/vertical skew as needed.
Nudge Distance Setting: Adjust how far an object moves with each keyboard nudge—set this directly in the Nudge Distance box on the Property Bar for micro/macro moves.
F. Transforming with Dockers
Transform Docker: Access via Window > Dockers > Transform. This Docker enables you to batch process objects—move, rotate, scale, mirror, skew—with precise values.
Position Section: Manually enter X/Y to place objects.
Size Section: Specify precise dimensions.
Rotate/Skew Section: Enter degree values for rotation/skew.
Mirror Section: Instantly flip objects horizontally or vertically.
Batch Actions: Process multiple selected objects in one go—ideal for layouts and duplications.
Objects Docker: Manage layers, groups, and locked/hidden elements. Perfect for selecting complex components and applying transformations—especially when direct canvas selection is hard.
Properties Docker: Modify object attributes and transformations (size, position, angle) in a single central panel. This is key for reviewing and applying global changes efficiently.
G. More Tips and Productivity Tricks
- Duplicating With Transformation: Use Ctrl+D to duplicate; adjust settings to transform-copied objects by a set distance or rotation.
- Multiple Copies at Transformation: Use Alt+F7 dialog for creating multiple transformed copies.
- Property Copying: Drag attributes from one object to another, or use the Attribute Eyedropper for advanced property and transformation replication.
- After any transformation, the status bar and property bar update to reflect object position, dimensions, and other key settings.
- For layered and nested objects use the Objects docker to isolate and transform hard-to-select components.
- For precise workflows, combine property bar value entry with keyboard shortcuts for speed and control.
- Mastering these transformation features and workflows will empower you to create precise, flexible, and efficient designs in CorelDRAW—crucial for both simple edits and advanced vector art projects.
- Always check the Status Bar for real-time feedback on position and transformation values.
You can change the appearance of objects in the drawing window by using the following transformations.
| |
Sizing lets you change the width and height of an object. | |
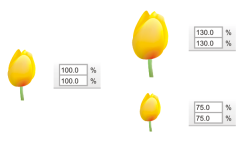
Scaling lets you size an object to a percentage of its original size. | |
Skewing lets you slant an object to one side. | |
Stretching lets you change the height and width of an object nonproportionally. | |
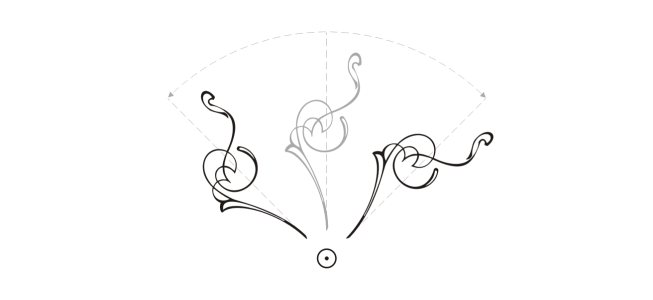
Rotating lets you turn an object around its center axis or a point relative to its position. | |
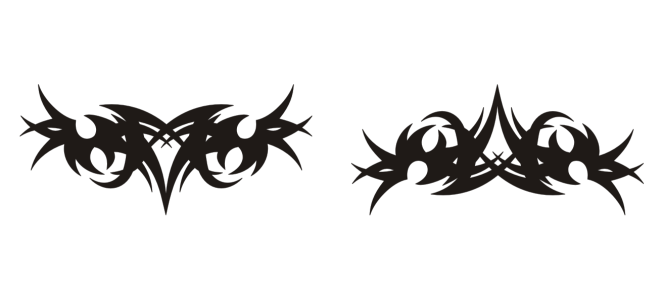
Mirroring lets you create a horizontal or vertical mirror image of an object. | |
Transform objects interactively
You can transform an object interactively by using the mouse and the Pick tool. This method is the quickest, but it is not recommended if you want to transform an object with precision.
Other methods for transforming objects
You can transform an object in any of the following ways:
•
For more precise results, you can select an object with the
Pick tool and adjust settings on the property bar. For example, you can specify a precise rotation angle or specify the size of an object.
•
The
Transform docker lets you transform objects with precision and apply the transformation to the duplicate of an object, which is created automatically. This feature lets you experiment with transformations without affecting the original object. You can access the
Transform docker by clicking
Window  Dockers
  Transform
.
•
The
Transform toolbar also lets you transform objects with precision. You can access the
Transform toolbar by clicking
Window  Toolbars
  Transform
.
Each of these methods lets you apply transformations to a single object or to multiple objects simultaneously.
Clear and redo transformations
All transformations can be simultaneously cleared at any time.
To transform an object interactively
1 Select an object by using the
Pick tool

.
The bounding box of the object appears. The bounding box includes eight selection handles that you can use to size, stretch, and mirror the object. If you click the object again, new handles appear. You can use these handles to rotate and skew the object.
Handle types: selection (1), rotation (2), and skew (3)
2 Perform a task from the following table.
| |
| Drag a corner selection handle. |
| Drag a middle selection handle. |
| Click the object to display the skew handles, and drag a skew handle. |
| Click the object to display the rotation handles, and drag a rotation handle. |
| Hold down Ctrl, and drag a selection handle to the opposite side of the object. |

If you want to leave the original object unchanged and apply the transformation to copies that are created, type a number in the Copies box in the Transform docker.
To clear all transformations applied to an object
2 Click
Object  Clear Transformations
.

You can undo the Clear Transformations command by clicking Edit  Undo Clear Transformations.
CorelDRAW lets you size and scale objects. In both cases, you change the dimensions of an object proportionally by preserving its aspect ratio. You can change the dimensions of an object by specifying precise values or by changing the object interactively. When you scale an object, you change its dimensions by a specified percentage.
To size an object
| |
| Drag any of the corner selection handles. |
| Type values in the Object size boxes on the property bar. |
Size a selected object from its center | Hold down Shift, and drag one of the corner selection handles. |
Size a selected object to a multiple of its original size | Hold down Ctrl, and drag one of the corner selection handles. |
Stretch and size a selected object simultaneously | Hold down Alt, and drag one of the corner selection handles. |

The anchor point of an object, also known as "object origin," remains stationary when you resize the object by typing values in the Object size boxes on the property bar. If you want to change the object origin, click a point on the Object Origin button  on the property bar.

You can also size an object by clicking Window  Dockers
  Transform, clicking the Size button and then typing values in the Transform docker.
To scale an object
2 In the toolbox, click the Free Transform tool  .
. 3 Click the Free scale button  on the property bar.
 If you want to change the object origin, click a point on the Object Origin button  on the property bar.
 4 Type a percentage by which you want to scale the object in the Scale factor boxes on the property bar.
| |
Apply the scaling according to the object’s position rather than the x and y coordinates | Click the Relative to object button  on the property bar. on the property bar. |
Scale an object using the Transform docker | Click Window  Dockers Dockers  Transform. Click the Scale and mirror button, type values in the X and Y boxes, and click Apply. Transform. Click the Scale and mirror button, type values in the X and Y boxes, and click Apply. |
Leave the original object unchanged and apply the transformation to a copy | Click the Apply to duplicate button on the property bar, or type a number in the Copies box in the Transform docker. |

The object origin, also known as "anchor point" or "reference point," can be the center of an object or any one of the object’s selection handles. The object origin remains stationary when an object is scaled by typing values in the Scale factor boxes on the property bar.

You can also scale an object by dragging a corner selection handle.
You can also scale an object by using the Transform toolbar. To open the toolbar, click Window  Toolbars
  Transform.
Skew and stretch objects
You can skew and stretch objects in CorelDRAW. When you skew an object, you specify the degree by which you want to slant the object. Stretching changes an object’s vertical and horizontal dimensions non proportionally.
CorelDRAW also lets you change the skew and sizing anchor point of an object from its default center position.
Skewing an object horizontally
Stretching an object horizontally
To skew an object
2 In the toolbox, click the Free transform tool  .
. 3 Click the Free skew button  on the property bar.
 4 Type values in the Skew angle boxes on the property bar to specify the number of degrees by which you want to skew the object horizontally or vertically. If you want to apply the scaling according to the object’s position rather than the x and y coordinates, click the Relative to object button  on the property bar.
You can also skew an object interactively by dragging one of its skew handles  . If the skew handles are not displayed, click the selected object again, and point to the middle handles.
You can also access skewing options from the Transform docker.
To stretch an object
2 Click Window  Dockers
  Transform.
 3 In the Transform docker, click the Size button. 4 Disable the Proportional check box. 5 Type a value in the following boxes: • W — lets you specify the width of a selected object • H — lets you specify the height of a selected object 
The new values that you enter to stretch an object are the basis for a new ratio of the horizontal and vertical dimensions of the object. When you enable the Proportional check box, any resizing of the object is based on this new ratio. To revert the object to its original one-to-one proportions before transforming it again, you must enable the Proportional check box, and then retype the original values.

You can change object dimensions proportionally by enabling the Proportional check box, typing a value in either the H or W box, and pressing Enter.
You can also stretch an object from its center by pressing Shift and dragging a corner selection handle.
You can also stretch an object in increments of 100% by pressing Ctrl, and dragging a corner selection handle.
CorelDRAW lets you rotate and create mirror images of objects. You can rotate an object by specifying horizontal and vertical coordinates. You can move the center of rotation to a specific ruler coordinate or to a point that is relative to the current position of the object.
Rotating objects around a single point
Mirroring an object flips it from left to right or top to bottom. By default, the mirror anchor point is in the center of the object.
Mirroring an object from top to bottom
To rotate an object
To rotate an object around a ruler coordinate
To mirror an object
To copy size, position, or rotation from one object to another
1 In the toolbox, click the Attributes Eyedropper tool  .
. 2 Click the Transformations flyout on the property bar, and enable any of the following check boxes: 3 Click the object whose transformations you want to copy. The Attributes Eyedropper tool automatically switches to the Apply object attributes mode. 4 Click the object to which you want to apply the copied transformations. 
Options that are enabled in the Properties and Effects flyouts on the property bar are also applied when you copy properties.
Conclusion
The Pick Tool’s flexibility and centrality make it the starting point for most CorelDRAW operations. Whether you are a beginner or a power user, mastering the Pick Tool will streamline your workflow and make every other tool more effective. The Pick Tool “rules” the workspace because all transformations and edits depend on selection. Its advanced controls enable bulk actions, precise alignment, and fluid navigation—making it the indispensable gateway to mastering CorelDRAW operations.


